Best Photography Locations in Madeira
- 19 hours ago
- 15 min read
This article is part of the Complete Guide to Photography in Madeira
There are some incredible photography locations in Madeira, but getting the most from the island depends on choosing the right spot for the conditions. I’ve spent months researching and shooting Madeira, chasing the fog in Fanal, watching cloud inversions at Pico do Arieiro, and studying the light across the coastline and mountains.
This article breaks down the best photography locations in Madeira, with map links to each location and detailed advice on picking the right conditions, timing your visit, and planning your shoot.
Madeira has an unusual geography and climate, and understanding how the conditions work will help you make better decisions about which locations to visit and when. Keep these three factors in mind:
Microclimates change everything: The weather where you are can be very different from the conditions at your photography location, even if it’s nearby. Be prepared to check multiple spots and move on quickly if the conditions aren’t right.
Forecasts are only a suggestion: The weather changes quickly as systems move in from the ocean and interact with the landscape, making it difficult to predict. Check the forecast but don’t rely on it. Instead, visit in person whenever you can, or use Madeira’s system of webcams to quickly check conditions at different points around the island.
Sun alignment is critical: Madeira’s position and orientation mean that different locations receive sunrise and sunset light at different times of year. Check the position of the sun before planning a shoot that depends on specific light.
Contents

Fanal
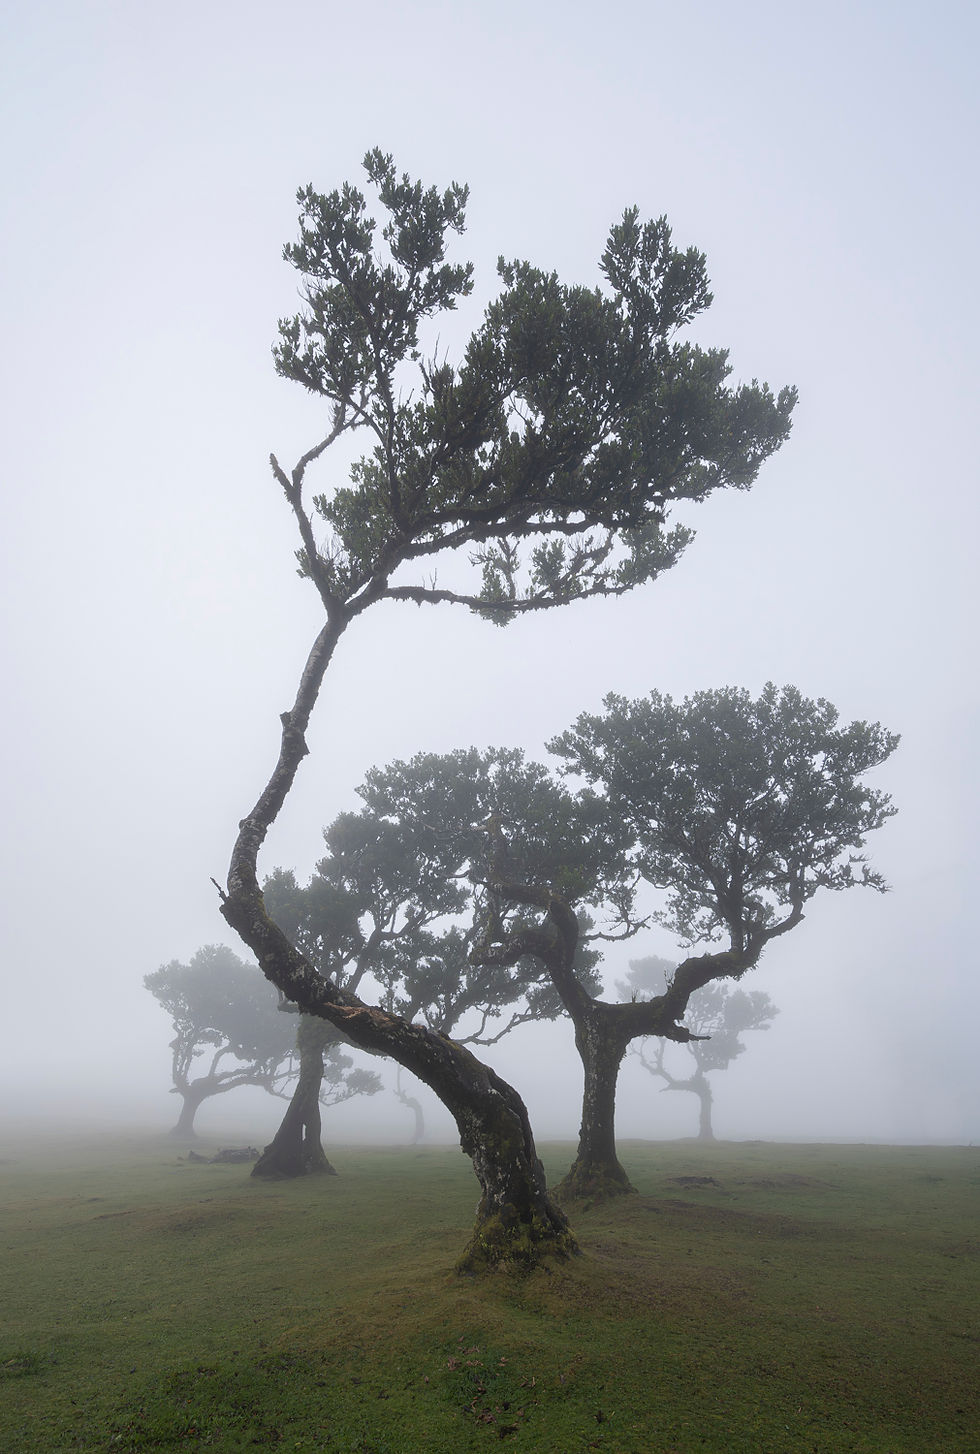
Fanal Forest is one of the most distinctive photography locations in Madeira, recognisable for its ancient laurel trees emerging from the fog. It feels more like an open meadow than a dense forest, small enough to walk across in fifteen minutes, but with enough individual trees and shapes to keep you working for several hours.
This is my anchor location on Madeira; I regularly check for fog here and return often if the conditions are right.
Photography Approach
How to Shoot: My favourite way to capture Fanal is by slowly walking among the trees, looking for shapes and patterns. Some trees have become well known, but the density of fog is constantly changing the scene and new compositions emerge as you move.
Lens Choice: You’ll need a medium zoom lens for the most flexibility, though some scenes work beautifully with a wide-angle. There’s not much here for a long lens, especially in the fog.
Exposure: Watch your histogram carefully. Thick fog absorbs light, making scenes darker than they appear to the eye. Your exposure settings can make the mist appear more or less dense, and it’s worth trying a few different exposures to see the effect.
Weather and Timing
The Fog Factor: Photographs of Fanal are closely tied to misty conditions, which separate the trees and simplify the background around their twisting branches. Fog isn’t guaranteed, but it is fairly common and you’ll have a good chance if you have three or more separate attempts.
Unpredictability: Fanal’s fog is caused by humid ocean air cooling as it rises up Madeira’s steep coastline. It’s highly localised, making it hard to forecast, and you can’t tell from the nearby coast whether there will be fog at Fanal.
Best Time to Visit: Sunrise is usually better spent on the coast, where locations make better use of direct light. I recommend shooting sunrise by the ocean, then heading up to Fanal early in the morning for the best chance of mist and quiet trails.
Logistics
Access: Fanal has free parking and toilets on location, a ten-minute walk from the centre of the meadow. There are no entrance fees, and access to the main area is straightforward.
Restrictions: For the preservation of the forest, there are increasing restrictions at Fanal, including new tape barriers that ensure visitors stick to marked trails. Drones are not allowed at this location.
Gear & Comfort: Fanal in the fog can be damp and you may be exploring for a couple of hours. Even though the walk is easy, bring waterproofs, good boots, and plenty of lens cloths to handle the moisture. I recommend leaving the tripod behind so you can react more quickly to the shifting visibility in the fog.
Ribeira da Janela
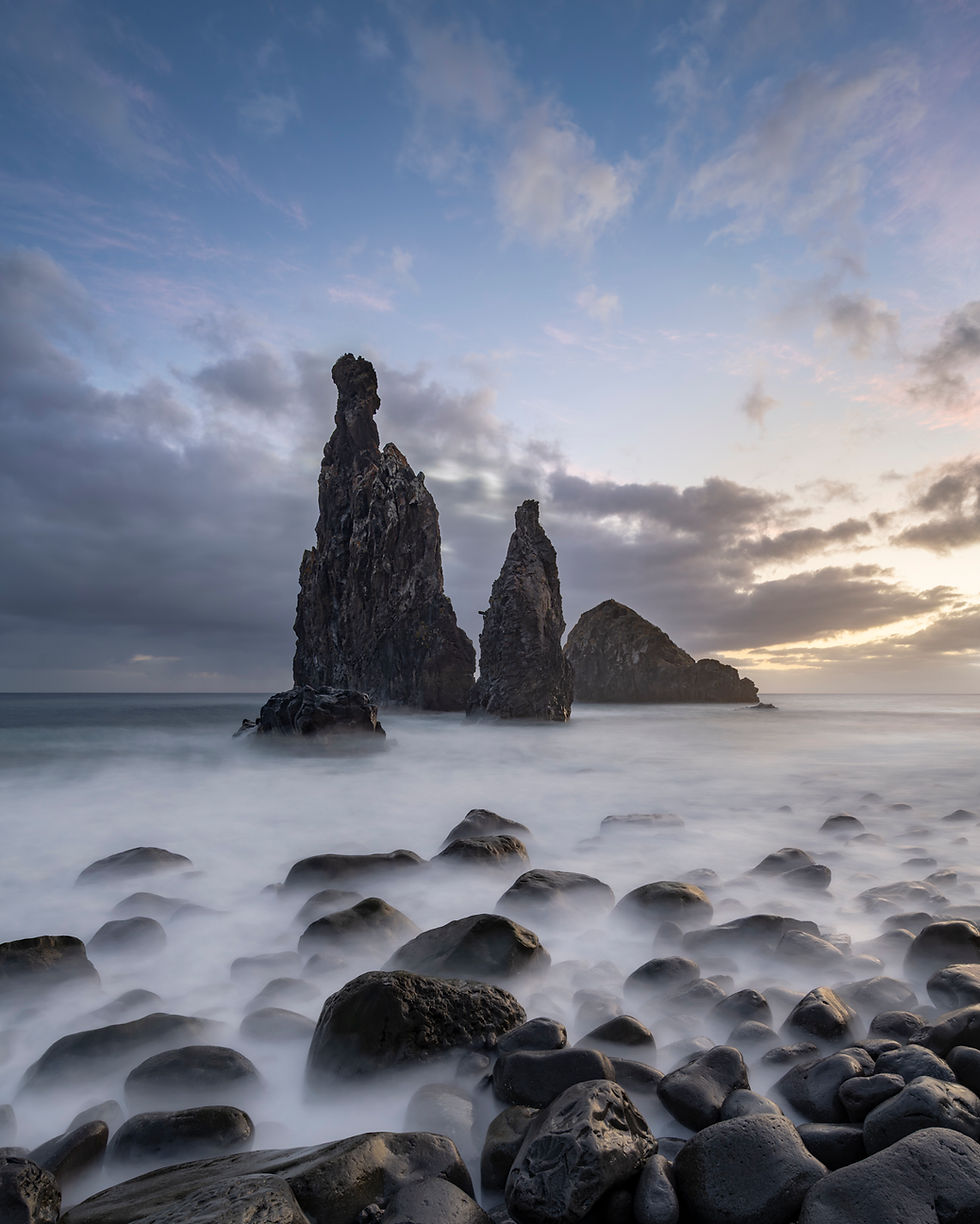
Ribeira da Janela is one of the most rewarding coastal photography locations in Madeira, with dramatic sea stacks just off the shore and a long pebble beach full of foreground options. There is pretty coastline everywhere on the island, but Ribeira da Janela has a great combination of easy access, varied foregrounds, and enough features that you can study the scene in depth and develop creative and unique compositions.
Photography Approach
Work the Scene: Don’t arrive with a single composition in mind. Take time to walk the beach, check your options, and watch how the sea stacks change shape as you move around them. This location rewards time and careful thought.
Foreground Elements: Use the length of the pebble beach to search for foregrounds, especially wet stones, tide pools, and lines created by the shifting waves.
Lens Choice: A wide-angle lens is most useful here because it will allow you to magnify nearby features and create more options in the foreground. Medium and long lenses can be helpful, but focus on wider views first.
Weather and Timing
Sunrise Focus: Ribeira da Janela is best at sunrise, especially if there are clouds above to catch some colour. Aim to arrive on location an hour before sunrise to get the most from the twilight colour.
Sun Position: The sun generally rises behind the rocks in summer, and to their right in the shoulder seasons and winter. Don’t become attached to particular images of sunrise at this place; they may not be possible during the season of your visit.
Other Possibilities: Ribeira da Janela also works in stormy or overcast weather. On days with heavy cloud, experiment with black and white images, or studies of texture and shapes.
Logistics
Map Links: Ribeira da Janela | Parking
Access: There’s a free parking area less than a five-minute walk from the shore. At peak times, the best approach is to wait for someone to leave, as visitors generally don’t spend long exploring.
Safety: Watch out for strong swells and unexpected surges at this location. Keep an eye on the ocean while shooting foregrounds; even if you’ve been in the same position for thirty minutes, a larger wave can take you by surprise.
Nearby Plan: A good morning plan is to shoot Ribeira da Janela at sunrise, then head straight to Fanal after you’ve captured the best light. They are twenty minutes apart, and it’s not unusual to get clear skies on the shore and fog at Fanal.
Pico do Arieiro to Pico Ruivo Hike

The 7km PR1 ridge walk between Pico do Arieiro and Pico Ruivo is one of the photography highlights of Madeira, and the most accessible route into Madeira’s central mountains, though it is still a demanding hike.
You can take on the hike with camera gear with a little preparation, and you’ll find a huge collection of viewpoints, ridges and rock formations to shoot. You can visit each peak independently, but the ridge walk is worth the time commitment if you want the full range of mountain compositions.
Photography Approach
Lens Choice: The variety on this route is the main challenge, and you’ll likely find a use for everything from a wide-angle to a long telephoto. If you need to limit your gear, I would prioritise a medium telephoto for compressing the ridges, isolating distant peaks, and capturing hikers on the trail.
Use the Trail: It’s easy to focus on the viewpoints, but the trail is one of the best subjects here. Other hikers can add scale to the peaks, and there are points where the path works well as a leading line.
Hiking with Gear: Sections of the trail are steep and narrow, and a tripod can be unwieldy on this route. Bring a lightweight tripod if you can, and attach it to the back of your bag to avoid adding width to your pack.
Weather and Timing
Cloud Inversions: Cloud inversions are a highlight of this trail, and are most striking at sunrise and sunset when the light catches the clouds below you. They’re hard to predict, but aim for days with low wind and visit early for the best chance.
Challenging Weather: The path is well-maintained, but mountain weather is unpredictable and potentially risky. If you have options, visit on a day with limited rain, and avoid low cloud sitting on the ridge, which can obscure the peaks completely.
Sunrise Light: Both peaks are great sunrise locations, but also popular with other visitors. Pico do Arieiro has the most composition options, but be prepared for a busy trail even before sunrise.
Logistics
Map Links: Pico do Arieiro Trailhead | Pico Ruivo Trailhead
Permits and Closures: At the time of writing, you need to book a timed entry slot and buy a permit for access to the PR1 route through Madeira’s SIMplifica website. The earliest slots can sell out days in advance, so book ahead if you want to start early.
Route Planning: Most visitors start at Pico do Arieiro, and it’s best to follow this pattern to avoid moving against the flow of people. You can hike as a one-way route, with shuttle services and tour operators helping with transport back to the start.
Parking: Pico do Arieiro has two free parking areas. The upper lot is strictly limited to one hour, so park lower down if hiking. At the Pico Ruivo end, the main parking area is at Achada do Teixeira, with an additional 2km hike to the peak.
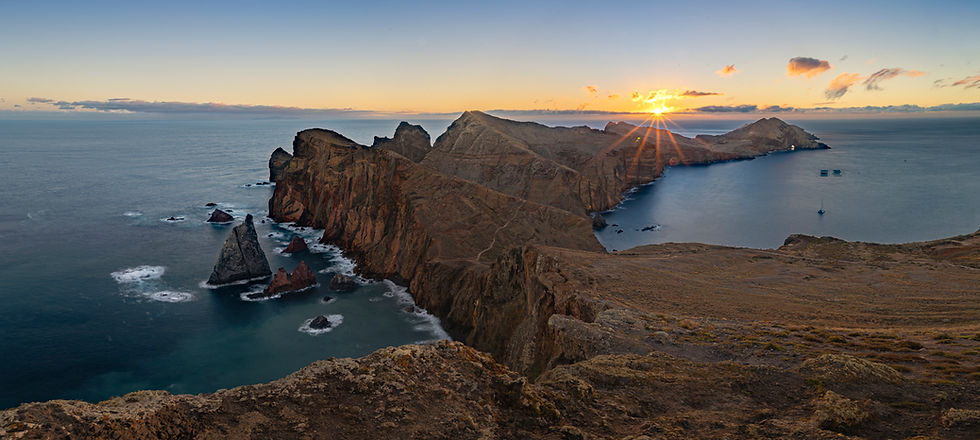
Ponta de São Lourenço

Ponta de São Lourenço is the eastern tip of Madeira, and it has a barren landscape that feels completely different from the rest of the island. This narrow peninsula is dry and exposed, with high viewpoints, sharp ridges, and sea stacks lining the shore.
There’s an incredible sunrise viewpoint near the parking area, and a variety of seascape opportunities along the peninsula, making this both a striking and flexible place to photograph.
Photography Approach
Sunrise at Miradouro do Abismo: Start at Miradouro do Abismo for a wide view of Ponta de São Lourenço. This is my favourite place to watch sunrise on the island, and it changes completely with shifts in the light and weather.
Continue the Hike: The peninsula trail has 4km of coastal variety, which makes it the perfect balance to the classic view at Abismo. Work your way along the cliffs to capture the peninsula from different positions, and look for smaller scenes on both sides and back towards the main island.
Lens Choice: The large-scale views of Ponta de São Lourenço need a very wide-angle lens. I had to stitch images taken at 14mm to make the one above. However, the peninsula is varied, and you’ll use a medium and long lens just as much on the route.
Weather and Timing
Two-Visit Strategy: Come here twice. First, arrive in the afternoon as people are leaving to scout the hike up to Miradouro do Abismo, which is more difficult in the darkness before sunrise. Visit again in the morning for sunrise at Abismo and an early start on the rest of the trail.
Best Light: Ponta de São Lourenço faces east but curves slightly to the south, so sunrise often brings colour in the sky, while evening light can catch the cliffs from the side.
Weather Conditions: Broken cloud is often best, as dappled light brings out more depth in the uniform rock of the peninsula. The harsh light of a clear sky can wash out the scene.
Logistics
Map Links: Miradouro do Abismo | Ponta do Furado | Parking
Access and Fees: There’s plenty of parking along the road approaching the peninsula, but it can fill up by 9am. Arrive for sunrise or in the afternoon when the first visitors are leaving for the day.
The Hike: The path is popular and well-maintained, but very exposed to sun and wind with nowhere to shelter. Bring layers, good footwear, and plenty of water. At the time of writing, there is a €4.50 trail fee payable via QR code at the entrance. The main route through the peninsula is the PR8 trail.
Supplies and Facilities: There’s a café on the peninsula close to the end, with public toilets. The café usually closes in the afternoon, so you will need your own supplies if you plan to hike later in the day and watch the sunset.
Ilhéu de Santa Cruz

Ilhéu de Santa Cruz is a small sea stack beside Madeira’s international airport, and one of the island’s strangest coastal photography locations. It can be surprisingly peaceful and full of creative opportunities in the swirling water and patterns of rock. It’s an easy stop as you travel around the southeast, with the extra advantage that you can visit on your way to or from the airport.
Photography Approach
Long Exposures: This is a tiny location, but you can use detail and patterns to find variety in the scene. Long exposures work well here, especially for softening the water around the rocks and adding movement to the foreground.
Embrace the Constraints: On the rocks, you are surrounded by the sea on three sides and a large airport wall behind you. This isolation can help you slow down, using the limitations to explore in depth and look for creative options.
Use the Weather: Wide images of the scene work well here, so you can include a lot of sky in your frame. This makes it a good location for capturing the sky and changing conditions.
Weather and Timing
Best Light: This spot faces southeast, into the rising sun during winter, and it can also catch good colour at sunset. Compositions are limited, so I recommend scouting it during the day before committing to a sunrise or sunset shoot.
Overcast Days: This location also works well on an overcast day, when textured cloud can match the movement and patterns in the water.
Rough Seas: When the sea is rough, the waves crash dramatically around the rocks, giving you more dynamic movement to work with in your foreground. However, this is an exposed location, so watch carefully from the steps before fully descending in stormy weather.
Logistics
Map Links: Ilhéu de Santa Cruz | Airport Parking
What to Expect: This is not a polished visitor destination. Access is via a narrow stone staircase leading to a small platform of rock, and the entrance is a little neglected and can smell unpleasant. However, the platform itself is surprisingly peaceful.
Access & Parking: The location is so close to the terminal that the nearest practical place to stop is the P8 airport parking area. From there, it’s a short walk to the narrow stairs. Check current airport parking charges before visiting, as this is airport parking rather than a regular roadside stop.
Safety: The rocks are slippery and the platform is narrow, so take care when working close to the water.
São Vicente

São Vicente is a spread-out town on Madeira’s north coast that extends into the mountains, with terraced gardens climbing both sides of a wide valley. This is a great place to explore views of a wide forested valley, along with scattered buildings, layered hillsides, and mist flowing around the peaks. São Vicente looks incredible in dramatic light, and will add real variety to your collection of images from Madeira.
Photography Approach
Hillside Exploration: The best spots for photography come from the hillside neighbourhoods, which have beautiful views of the tree-covered mountains. Drive or walk up the terraced streets to discover unique vantage points over the central valley.
The Chapel Viewpoint: A reliable viewpoint is the Capelinha de Nossa Senhora de Fátima. This small chapel on the east side of the valley has a clear viewing platform across São Vicente, and works best in the afternoon when the light is coming from the west.
Lens Choice: You’ll need a long lens to pick out details in the valley from the viewpoints, and wider scenes work well with a 24mm lens. You’ll have less use for an ultra-wide lens here.
Weather and Timing
Skip the Golden Hour: São Vicente is not a good location for sunrise or sunset because the high walls of the mountain valley block the light when the sun is low.
Light Shafts: Shafts of light are common as patches of cloud cling to the mountains, but plan your shooting location so you are facing towards the sun. This works best from the hillside chapel in mid-afternoon.
Use the Conditions: São Vicente works well on an overcast day, and clear skies create blue haze around the peaks. Use this as a place to come when conditions are too cloudy for good light on the coast.
Logistics
Map Links: São Vicente | Capelinha de Nossa Senhora de Fátima
Photography Base: São Vicente is well connected to the northwest and central valley running across Madeira, making it a flexible base for a photography trip.
Parking & Access: Facilities are concentrated near the coast where parking is easier, but most of the best photography spots are higher up the valley. You can hike up to the chapel from the town centre or park by the roadside, though roads in the outer neighbourhoods are narrow and parking can be difficult. The best option is often to park safely on a wider section of road higher up the valley, then continue into the hills on foot.
Porto Moniz

Porto Moniz is the northernmost town in Madeira, set on a small peninsula below the high cliffs of the northwest coast. It has a pretty seafront promenade, with fantastic views of the cliffs and sea stacks in the water. Porto Moniz has good restaurants and facilities, and you can photograph the ocean from the centre of town, making it a comfortable and easy place to shoot, especially during stormy weather.
Photography Approach
Seafront Exploration: The seafront wraps around Porto Moniz, with different subjects along the coast to the southeast and out to sea to the north. Allow time to explore the different ocean views around town.
Framing the Coast: Porto Moniz blends the urban environment with the natural coastline, so you can choose between including features of the town or carefully framing for more natural scenes.
Layered Views: Follow the promenade east for a fresh perspective along the coast towards the sea stacks at Ribeira da Janela. It is a fantastic spot for layered compositions using a telephoto lens.
Weather and Timing
Stormy Conditions: On a stormy day with rough seas, Porto Moniz is the ideal place to visit. You get safe spots to photograph waves hitting the rocks, and can warm up in a café afterwards.
Sunrise Light: The ocean views here look great during the rich colours of morning twilight, and sunrise is a much quieter time to visit. Sunset light does reach the town in peak summer, but falls behind the cliffs in winter, and there are always more visitors around at the end of the day.
Logistics
Map Links: Promenade | Ribeira da Janela View
Access: There is plenty of free parking in town, and you can walk across Porto Moniz in less than ten minutes. This is a very easy place to stop on the northwest coast.
Base Potential: Porto Moniz has plenty of facilities and easy access to great photography locations in the northwest. It’s a useful sunrise option before a visit to Fanal, and worth considering as a photography base on your trip.
Swimming Pools: Some of the seafront is occupied by public swimming pools, which require an entrance fee. The pools are interesting to visit, but they are not a priority for photography.
Porto da Cruz

Porto da Cruz is a beautiful town with a great mix of photography opportunities and visitor facilities, making it one of my favourite places to spend an afternoon in Madeira. There’s a huge volcanic rock formation (Penha d’Águia) next to the town, an interesting headland with sea stacks offshore, and fantastic views of the layered cliffs leading south out of town. Porto da Cruz is the ideal place to stop for a good meal and a slow afternoon of varied photography.
Photography Approach
Best Area: If you only have a short time in Porto da Cruz, follow the path around the headland for views of Penha d’Águia, the sea stacks, the rocky coastline, and the tall cliffs to the south. This small area has the densest collection of scenes for photography.
Photography Gear: You can use every lens at this location, though wide-angles work best on the headland, especially for foregrounds leading to the sea stacks. Longer lenses will allow you to pick out details in the coastline, and it’s worth bringing a tripod and filters for flowing water shots on a sunny day.
Extend Your Stay: There’s a good collection of restaurants in Porto da Cruz and a working rum distillery. I like this place for a lower-intensity day of photography, where it’s easy to stop for coffee or food, and there’s real variety to explore with the camera.
Weather and Timing
Best Light: Porto da Cruz faces northeast, looking into the sunrise in the summer. The headland and sea stacks make great subjects in the early morning, though the village is in shadow at sunset.
Weather Conditions: The variety of subjects around Porto da Cruz means that you can find something to shoot in any weather, though some of the wider views of the surrounding cliffs need good visibility.
Rough Seas: The headland and waterfront lookouts make this a safe place to watch the water in stormy weather, and you can use a long lens to capture wave details from a distance.
Logistics
Map Links: Headland and Sea Stacks
Access: There’s a central parking area near the water in Porto da Cruz, though it can be busy in peak season; arrive early for the quietest time to explore. You can explore the whole village and seafront on foot, and all the photography options are close together.
Eastern Base: Porto da Cruz has good links to Pico do Arieiro and Ponta de São Lourenço, making it a viable option for a base in the east. It’s a long way from Fanal and the northwest, so it works best if you plan to stay in more than one place in Madeira.
Safety: Be cautious if working close to the sea on the headland around the sea stacks. The rocky coastline can be deceptive, and occasional strong waves can catch you by surprise.
Discovering Photography Locations in Madeira

Madeira has a dense collection of photography locations, from sea stacks and volcanic coastlines to mountain ridges, waterfalls and ancient forest. The most famous places are popular for good reason, but they work best as starting points rather than a complete list.
One of the advantages of photographing Madeira is how quickly the conditions can change between different parts of the island. If the mountains are covered in cloud, the coast may still have light. If one side of the island feels flat, another may have mist, waves or dramatic skies. Locations are only part of the equation, and some of the best light appears in the most unexpected places.
For a more complete guide to photographing the island, my Madeira Photography Travel Guide includes 50 locations across Madeira, with detailed maps, practical access notes and planning advice to help you make the most of the island’s changing conditions.

About the Author

I’m Kevin Read, a photographer and travel writer creating practical resources for photographers planning their own trips. My guidebooks and articles are based on first-hand location research and photography, with advice on light, conditions and travel planning. I also publish a free monthly photography and travel magazine called In The Frame.
Comments